Codemasters F1 2016 - 'Realistic onboard' tv ReShade Presets by MMPAW44.

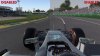
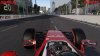
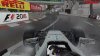
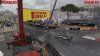
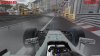
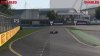
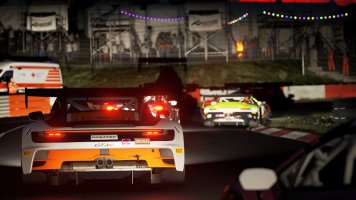
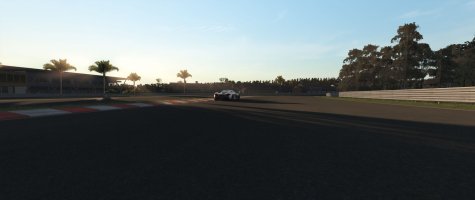
'ONBOARD' CAM REALISM LIGHTING & COLOUR.
Here i present my Personal ReShade Presets including 2 Alternate versions.
For those of you that would prefer the REAL 'ONBOARD' Camera lighting & colour look, then i hope you'll enjoy these presets!.
Camera lenses don't capture light & colour in the same way a human eye does, and therefore from viewing Onboard footage, you'll see the difference.
I've tried to create these versions as near as i can to what is seen when viewing Onboard cam footage; however, in creating these versions there has been compromises due to the methods used to create them - but i feel i've made the right balance.
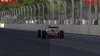
You'll notice when viewing REAL TV footage, there is a significant difference in both the ambient 'haze' and tyre brightness/colour, compared to the default Codemasters 'look'. I always felt that Codemasters' applied too much contrast/darkness to the look of the tyres, so this is one reason why i create my own personal ReShade Presets.
Obviously, the way a game looks is without doubt all about ones own personal preference; some prefer a more saturated/contrasted look, while others prefer a more brighter/less saturated look...
However, regardless of preference, i've decided to share my work!
NOTE: Installation Instructions:
Within the archive you'll find 2 folders...
'Lower Exposure Version' & 'Brighter Exposure Version'
Within each folder you'll find 3 files - 'ReShade'(Folder) , 'dxgi.dll' & 'ReShade.fx' Files.
All you have to do once you've chosen which version you prefer, is to simply copy the ReShade folder along with the other 2 files (dxgi.dll & ReShade.fx) into the main F1 2016 Installation folder.
EXAMPLE: D:\Program Files (x86)\Steam\steamapps\common\F1 2016
(My installation is located on my D: HDD hence the D:. However, 'standard' installations are in drive C")
The presets are by default disabled - To Enable the effect, simply press 'DEL' on your keyboard. (You'll notice the 'Enabling / Disabling' of the effect in the upper left corner of your screen by text).
I have created these this way for a purpose - Should you want the image Brighter or Darker, you can easily add this by using the In-Game GAMMA setting is Graphics Options.
That's it really...ENJOY!
P.S. To create Screenshots using the ReShade effect, simply press 'PrintScreen' Key.
(Screenshots are usually saved to the Main installation Folder)
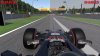
'ONBOARD' CAM REALISM LIGHTING & COLOUR.
Here i present my Personal ReShade Presets including 2 Alternate versions.
For those of you that would prefer the REAL 'ONBOARD' Camera lighting & colour look, then i hope you'll enjoy these presets!.
Camera lenses don't capture light & colour in the same way a human eye does, and therefore from viewing Onboard footage, you'll see the difference.
I've tried to create these versions as near as i can to what is seen when viewing Onboard cam footage; however, in creating these versions there has been compromises due to the methods used to create them - but i feel i've made the right balance.
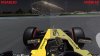
You'll notice when viewing REAL TV footage, there is a significant difference in both the ambient 'haze' and tyre brightness/colour, compared to the default Codemasters 'look'. I always felt that Codemasters' applied too much contrast/darkness to the look of the tyres, so this is one reason why i create my own personal ReShade Presets.
Obviously, the way a game looks is without doubt all about ones own personal preference; some prefer a more saturated/contrasted look, while others prefer a more brighter/less saturated look...
However, regardless of preference, i've decided to share my work!
NOTE: Installation Instructions:
Within the archive you'll find 2 folders...
'Lower Exposure Version' & 'Brighter Exposure Version'
Within each folder you'll find 3 files - 'ReShade'(Folder) , 'dxgi.dll' & 'ReShade.fx' Files.
All you have to do once you've chosen which version you prefer, is to simply copy the ReShade folder along with the other 2 files (dxgi.dll & ReShade.fx) into the main F1 2016 Installation folder.
EXAMPLE: D:\Program Files (x86)\Steam\steamapps\common\F1 2016
(My installation is located on my D: HDD hence the D:. However, 'standard' installations are in drive C
The presets are by default disabled - To Enable the effect, simply press 'DEL' on your keyboard. (You'll notice the 'Enabling / Disabling' of the effect in the upper left corner of your screen by text).
I have created these this way for a purpose - Should you want the image Brighter or Darker, you can easily add this by using the In-Game GAMMA setting is Graphics Options.
That's it really...ENJOY!
P.S. To create Screenshots using the ReShade effect, simply press 'PrintScreen' Key.
(Screenshots are usually saved to the Main installation Folder)