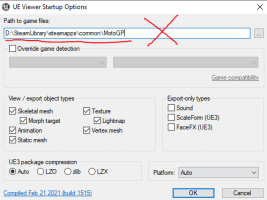
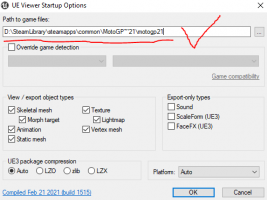
IMPORTANT: Following a recent umodel update, it is now possible to export models from the game.
This thread will teach you the very basics of modding the MotoGP games, I am going to try and explain more things this year but to start with we'll just stick to the basics.
Requirements:
1) Download these tools: https://www.racedepartment.com/downloads/motogp-21-modding-tools.42020/
2) You need Umodel (a.ka UE Viewer): https://www.gildor.org/en/projects/umodel
3) You need Unreal Engine Editor 4.25:
https://www.epicgames.com/unrealtournament/download
4) Also make sure you have Python 2.7 installed:
https://www.python.org/download/releases/2.7/
Text tutorial:
First of all we'll start with a bike skin as it's the main thing people want to edit and it's super easy, but once you understand the process you can try with something else.
Section 1: Export
Section 2: Import back in game
You're done! Check your mod in game.
First of all we'll start with a bike skin as it's the main thing people want to edit and it's super easy, but once you understand the process you can try with something else.
Section 1: Export
-Launch Umodel
- Copy the path to MotoGP 21 into the text box (Normally it is: C:\Program Files (x86)\Steam\steamapps\common\MotoGP™21 or wherever you have installed it).
- Don't try to navigate to it as you'll have issues, just copy the path directly into the text box.
- Select "Override Game Detection"
- Select "Unreal Engine 4" And "Unreal Engine 4.25 Plus"

Then hit OK.
- You'll now have a window with all the directories of the game. Navigate to: motogp21\Content\assets\graphics\vehicles\bikes\cat001\chassis\chassis101'

If you're unsure of the ID of the bike you want to edit click on textures and then on "livery001.uasset".
This will load the first texture of the bike so you can see if this is the bike you want to edit.
It will display something like this:

If you want to return to the previous screen press "O" and it will exit the preview.
- Once you have found the texure you want to edit click on "Tools->Export current object" and Umodel will export the texture currently being viewed.
-Umodel will automatically create a folder called "UmodelExport" located where Umodel.exe is.
You can now find the texture (.tga format) and edit it!
- Copy the path to MotoGP 21 into the text box (Normally it is: C:\Program Files (x86)\Steam\steamapps\common\MotoGP™21 or wherever you have installed it).
- Don't try to navigate to it as you'll have issues, just copy the path directly into the text box.
- Select "Override Game Detection"
- Select "Unreal Engine 4" And "Unreal Engine 4.25 Plus"

Then hit OK.
- You'll now have a window with all the directories of the game. Navigate to: motogp21\Content\assets\graphics\vehicles\bikes\cat001\chassis\chassis101'

If you're unsure of the ID of the bike you want to edit click on textures and then on "livery001.uasset".
This will load the first texture of the bike so you can see if this is the bike you want to edit.
It will display something like this:

If you want to return to the previous screen press "O" and it will exit the preview.
- Once you have found the texure you want to edit click on "Tools->Export current object" and Umodel will export the texture currently being viewed.
-Umodel will automatically create a folder called "UmodelExport" located where Umodel.exe is.
You can now find the texture (.tga format) and edit it!
Section 2: Import back in game
Part 1: Prepare your modded textures.
Basically we need to convert our modded .tga texture to .uasset.
- Launch Unreal Engine editor.
- Select Games.

- Select Blank Project.

- Select no starter content, choose a path to save the project to and then you can name it whatever you want. I'm going to call mine "Tutorial".
- Click on Create Project.

- Drag your modded texture here:

- Double Click the texture and change the Mip Gen setting to "NoMipmaps", this is so the texture doesn't appear blurry in game before loading fully.

- Click on File->Save all. This way you will not need to create a new project next time.
- Close texture window to return to the previous screen.
- Click on File->Cook content for windows. Wait till it finishes. You can close Unreal Engine now!
Basically we need to convert our modded .tga texture to .uasset.
- Launch Unreal Engine editor.
- Select Games.

- Select Blank Project.

- Select no starter content, choose a path to save the project to and then you can name it whatever you want. I'm going to call mine "Tutorial".
- Click on Create Project.

- Drag your modded texture here:

- Double Click the texture and change the Mip Gen setting to "NoMipmaps", this is so the texture doesn't appear blurry in game before loading fully.

- Click on File->Save all. This way you will not need to create a new project next time.
- Close texture window to return to the previous screen.
- Click on File->Cook content for windows. Wait till it finishes. You can close Unreal Engine now!
Part 2: Repack.
Go into "MotoGP 21 Modding Tools" folder from the rar. There you will see a folder called "motogp21". Inside it, you need to create the same Directory where you extracted the file from in Umodel:
"motogp21\Content\assets\graphics\vehicles\bikes\cat001\chassis\chassis101\textures"
Create the missing folders.
- Go to the location you saved the project to earlier (by default it will be "Documents\Unreal Projects\Name")
- Then from there go to "Saved\Cooked\WindowsNoEditor\Name\Content" here you will find the files Unreal Engine cooked for you. You should have 2 files. Copy BOTH of them into "motogp21\Content\assets\graphics\vehicles\bikes\cat001\chassis\chassis101\textures".
We're almost done!
- Now go back to the “MotoGP 21 Modding Tools” folder and double click repack command.bat
Once it's done (it's quick), you will have a file called "pakchunk0-WindowsNoEditor_X_P.pak". Replace the X with something else, like "pakchunk0-WindowsNoEditor_MyMod_P.pak"
Copy the pak file you created and paste into:
C:\Program Files (x86)\Steam\steamapps\common\MotoGP™21\motogp21\Content\Paks
or wherever you have installed the game. Make sure you copy it where all the other pak files are.
Last edited:


