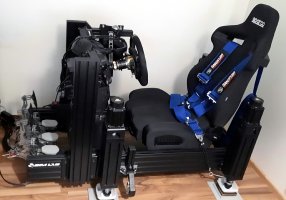
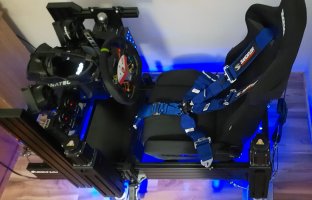
This weekend i added a passive seat belt tensioner to my SFX100 rig.
A couple of months ago i tried to do the same, but it did not give me the result i wanted. You can read all about that here.
https://www.racedepartment.com/thre...oner-with-simtools.163727/page-3#post-2916042
There were 3 things i did not like about my first attempt
1. The seat rear belt at the back is being pulled down under braking. This results in a downward pressure on your shoulders and i could not match that feeling with brake forces you experience in real life.
2. To get an reasonable amount of pressure, the initial spring tension already needed to be fairly big, resulting in a uncomfortable pressure on my shoulders in the rest position
3. It added unwanted additional "set-up time" since i have a mobile rig.
So initially i aborted the idea of a passive seat belt tensioner and decided to wait for the second controller support to build an active version.
In the topic above i already mentioned that, in my opinion, that tensioning the lower belt is more immersive. I believe that under braking you want the surge feeling coming from the front and not the back. Ideally, you would have all 4 belts being pulled back under braking.
With second controller support being officially announced i started to look a how i might implement this and already ordered some extra belt to start experimenting.
https://nl.aliexpress.com/item/Poly...756.html?spm=a2g0s.9042311.0.0.e60b4c4d0p0Fk2
Yesterday the belt arrived i decided to test my theory of tensioning the lower belt being more immersive first, before started to work on the design.
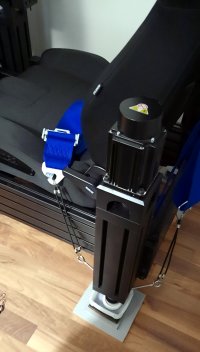
I tied the extra belt parallel to my seat belt fixing point and put the other end under the rear feet of the SFX100. I did some testing and adjustments, after a while I loved it so much, that i aborted the idea of an active seatbelt tensioner and decided to go with the passive solution.
With a passive solution it's much easier to connect 4 belts instead of 2 and my rig will stay less complex because there's no need to add an extra servo + driver. No need for a second controller or extra connections ( on a mobile rig )
With a passive 4 belts seat tensioner, there's also no need for an uncomfortable crotch strap, to avoid the belt being pulled upwards ( like in the rear seat belt tensioner version )

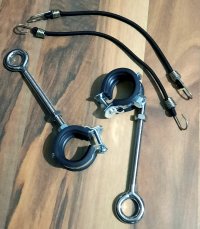
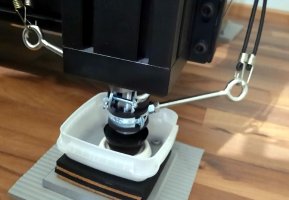
I designed and 3D printed a new "sticky foot" for the SFX100. Into the foot there are 2 M6 threads for the eye bolts. Connecting the belts to the feet in stead of the ground, makes it still possible to put the entire rig on a cart to move it, without additional effort.
No springs, springs are for pussies

The belts are mounted parallel to already fixed seat belt mounts on my GS-5. I have done this for a couple of reasons
1. When playing a game that can use a lot of heave or Pitch (like Dirt Rally) you really don't to want have a passive seat belt tensioner pulling you in the seat at every bump
2. When friends come to race and have a different seating position than me, you still want them to be able to be strapped into the GS-5.
In both cases i easily unhook the 4 belts and stil have the fixed seat belt like i always had.

The back belts are also being pulled, but still need some additional work. I still need to add some guides and rolls on bearings for maximum effect.

Pros & Cons of the Passive Seat belt tensionser 2.0
Pros:
- It's the best 20 bucks i ever spend on my rig
- Braking becomes super immersive
- I now have that instant, on the brake feeling with pressure coming from the front
- Like the GS-5, these are forces directly to the body and really give an extra dimension
- Simple, no additional servo or second controller needed
- Easy tunable through the surge travel in Simfeedback
- Small heave movements are not felt thought the belts
- You can even add some slack to the tension belts, so you only feel the tension during large surge movements
- Very easy to disconnect and still use the normal fixed seat belts for rally games, friends ect ect.
- Does not affect sliding my seat back and front (for getting in or out of the rig) in any way
Cons
-Large rig movement like heave, roll, pitch and sway will be felt through the belts to
-With pitch enabled, going uphill results in less tensioning, braking while going down hill results in more tensioning
- DO NOT enter the rig with a full bladder
- Like all passive seatbelt tensioners they are seat position based. If you move the seat, you have to re-adjust all the belts.
- Potentional dangerous if you do not know what profile you are using or have a clear understanding that both surge and pitch travel will added op top of each other in simfeedback under certain circumstances
Conclusion and STL link for the "passive sticky foot"
I really happy with my passive seat belt tensioner. It still needs some work, but i like it so much that for now i decided not to go for active seat belt tensioner anymore. Simfeedback profiles still need to be adjusted and perhaps even my GS-5 profiles might need some tweaking.
The build was cheap and pretty straight forward and also did not impact the looks my rig in any major way. To have this extra effect on a mobile rig, without adding any substantial "setting up time" is just great.
If you want to give this a try, I have uploaded the stick foot passive to my github which you can find here:
https://github.com/HoiHman/Simfeeback-STL-feet
For guys who have read the entire opening post and still are wondering "what are the rubber bands for"
They are there to keep the rubber feet from falling of when the rig is on the cart to move it.

A couple of months ago i tried to do the same, but it did not give me the result i wanted. You can read all about that here.
https://www.racedepartment.com/thre...oner-with-simtools.163727/page-3#post-2916042
There were 3 things i did not like about my first attempt
1. The seat rear belt at the back is being pulled down under braking. This results in a downward pressure on your shoulders and i could not match that feeling with brake forces you experience in real life.
2. To get an reasonable amount of pressure, the initial spring tension already needed to be fairly big, resulting in a uncomfortable pressure on my shoulders in the rest position
3. It added unwanted additional "set-up time" since i have a mobile rig.
So initially i aborted the idea of a passive seat belt tensioner and decided to wait for the second controller support to build an active version.
In the topic above i already mentioned that, in my opinion, that tensioning the lower belt is more immersive. I believe that under braking you want the surge feeling coming from the front and not the back. Ideally, you would have all 4 belts being pulled back under braking.
With second controller support being officially announced i started to look a how i might implement this and already ordered some extra belt to start experimenting.
https://nl.aliexpress.com/item/Poly...756.html?spm=a2g0s.9042311.0.0.e60b4c4d0p0Fk2
Yesterday the belt arrived i decided to test my theory of tensioning the lower belt being more immersive first, before started to work on the design.
I tied the extra belt parallel to my seat belt fixing point and put the other end under the rear feet of the SFX100. I did some testing and adjustments, after a while I loved it so much, that i aborted the idea of an active seatbelt tensioner and decided to go with the passive solution.
With a passive solution it's much easier to connect 4 belts instead of 2 and my rig will stay less complex because there's no need to add an extra servo + driver. No need for a second controller or extra connections ( on a mobile rig )
With a passive 4 belts seat tensioner, there's also no need for an uncomfortable crotch strap, to avoid the belt being pulled upwards ( like in the rear seat belt tensioner version )

I designed and 3D printed a new "sticky foot" for the SFX100. Into the foot there are 2 M6 threads for the eye bolts. Connecting the belts to the feet in stead of the ground, makes it still possible to put the entire rig on a cart to move it, without additional effort.
No springs, springs are for pussies

The belts are mounted parallel to already fixed seat belt mounts on my GS-5. I have done this for a couple of reasons
1. When playing a game that can use a lot of heave or Pitch (like Dirt Rally) you really don't to want have a passive seat belt tensioner pulling you in the seat at every bump
2. When friends come to race and have a different seating position than me, you still want them to be able to be strapped into the GS-5.
In both cases i easily unhook the 4 belts and stil have the fixed seat belt like i always had.

The back belts are also being pulled, but still need some additional work. I still need to add some guides and rolls on bearings for maximum effect.

Pros & Cons of the Passive Seat belt tensionser 2.0
Pros:
- It's the best 20 bucks i ever spend on my rig
- Braking becomes super immersive
- I now have that instant, on the brake feeling with pressure coming from the front
- Like the GS-5, these are forces directly to the body and really give an extra dimension
- Simple, no additional servo or second controller needed
- Easy tunable through the surge travel in Simfeedback
- Small heave movements are not felt thought the belts
- You can even add some slack to the tension belts, so you only feel the tension during large surge movements
- Very easy to disconnect and still use the normal fixed seat belts for rally games, friends ect ect.
- Does not affect sliding my seat back and front (for getting in or out of the rig) in any way
Cons
-Large rig movement like heave, roll, pitch and sway will be felt through the belts to
-With pitch enabled, going uphill results in less tensioning, braking while going down hill results in more tensioning
- DO NOT enter the rig with a full bladder
- Like all passive seatbelt tensioners they are seat position based. If you move the seat, you have to re-adjust all the belts.
- Potentional dangerous if you do not know what profile you are using or have a clear understanding that both surge and pitch travel will added op top of each other in simfeedback under certain circumstances
Conclusion and STL link for the "passive sticky foot"
I really happy with my passive seat belt tensioner. It still needs some work, but i like it so much that for now i decided not to go for active seat belt tensioner anymore. Simfeedback profiles still need to be adjusted and perhaps even my GS-5 profiles might need some tweaking.
The build was cheap and pretty straight forward and also did not impact the looks my rig in any major way. To have this extra effect on a mobile rig, without adding any substantial "setting up time" is just great.
If you want to give this a try, I have uploaded the stick foot passive to my github which you can find here:
https://github.com/HoiHman/Simfeeback-STL-feet
For guys who have read the entire opening post and still are wondering "what are the rubber bands for"
They are there to keep the rubber feet from falling of when the rig is on the cart to move it.


