General Proper technique in track making plus tips

This is mainly a direct copy from the AC forums. It may take some time to get it all here and linked properly to this forum so bear with me. Right now all the links below will take you to the AC forum. After I get all my posts in I will update them.

EDIT: This thread is not a place to ask random questions about random issues. It's purpose it to have useful posts with proven techniques and tips and maybe some questions about those posts. This does not mean that only I should post here. Anybody is welcome to contribute if they have something useful to add that is proven to work.

A suggestion was posted a while back to index all the "good" posts in this thread in the OP. So here they are.

Horizontal plane for better tree shadows

Road mesh tip
Road mesh bump tip

How to make a realistic looking road

Tree modeling tip

How to fix AI line issues in editor when using Blender

Making a proper road mesh for track conversions

Using the AC_CREW tag to load objects depending on grid size.

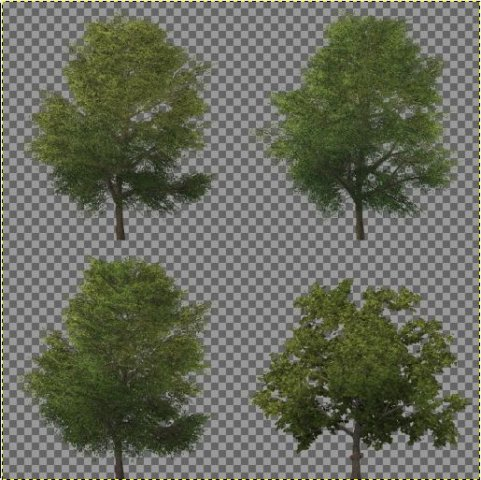
Common mistakes with trees in AC and how to name then and set them up properly.

Below is the original post
I'm not sure how useful this thread will be but it seems poorly running mod tracks seems to be an epidemic and some are simply saying "oh well that is the way it is". Well I'm here to say it doesn't have to be. All it takes is using proper technique and using some simple guidelines and your track will perform on par with Kunos originals. Remember Kunos aren't using any magical tools in that they more or less are using what we use to build tracks. They just know the proper techniques in how to efficiently assemble a track so it runs well.

Here are a few simple rules to follow that will help immensely.

First offense:

DO NOT USE PNG OR JPG FILES FOR YOUR TEXTURES!!!!

This is a #1 NO NO. PNG files are ok to use for testing as it can be a pain to assemble DDS files sometimes. But when it comes to release please be sure ALL textures are in DDS format. Just 1 PNG will cause stutters.

Second offense:

Keep your material list to a bare minimum. If you have multiple tree species on your track consolidate them into 1 or 2 textures. If you have 8 different trees do not have 8 different textures. Remember it is always better to have fewer but larger textures than a bunch of tiny ones. If your track has 500 different textures then you have too much. Try to keep it under 200 for the entire track.

Here are some examples of texture files.
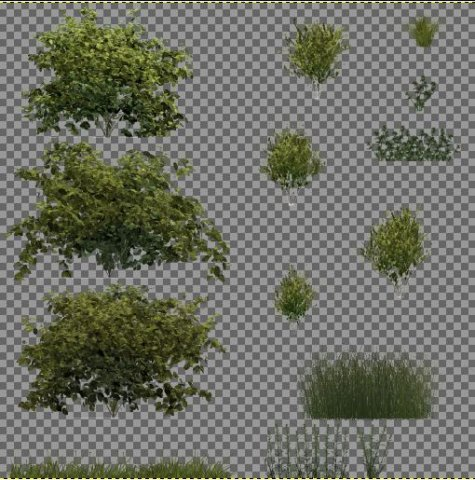
upload_2016-6-10_20-14-51.png


upload_2016-6-10_20-15-25.png


Third Offense:

Keep the amount of total objects to a bare minimum. If multiple objects share the same material merge them into one or a couple objects. This is basically the same concept as the materials. If you have 2000 fence posts around your track merge them into fewer but larger objects. You still don't want one huge object around the entire track. It is still best to break it up into say 4 or 5 different objects. No matter how you slice it 5 objects is better than 2000.

When you load up the render stats keep an eye on the DIP number. Most kunos tracks stay around or under 1000 in practice mode. Some mod tracks recently had as much as 5500 which is WAY too high. This number is directly tied to the amount of materials and objects. This high number causes excessive CPU usage and is also the reason AI is often a problem on mod tracks.

Fourth Offense:
Do not have a complex object like the armco barrier or tire wall be the actual wall. Any physical object should be as simple as possible.

As you can see here the barrier is simply visual. The actual 01WALL is the highlighted box around it. Just make you sure you set render to false in the editor.
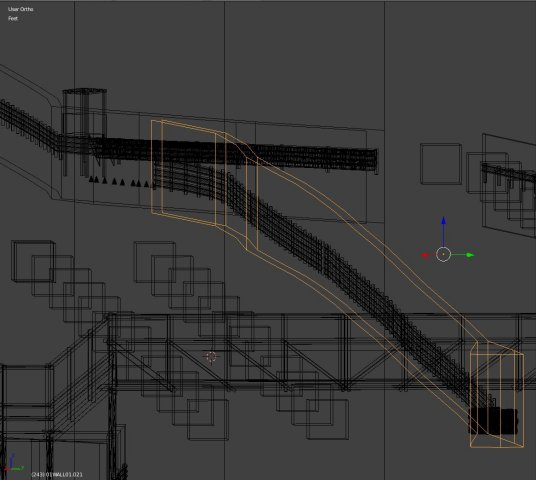
upload_2016-6-10_20-17-46.png


Also a recent thing I have seen is people making a two sided object a wall. This causes "sticky" walls. You need the wall object to be single sided or a something like shown above with some space between the two sides.

Final Thoughts:

Some have said "well stop using a garbage computer and upgrade". While some might agree but the entire statement is flawed. If it runs like garbage is doesn't automatically make it "next gen" and you need the latest hardware. All that needs to be done is a few simple rules need to be followed by the track maker and everyone can enjoy all your hard work. Remember if a track is setup correctly and runs smooth at it's core, it gives you the ability add all the details your heart desires and still run well.

I truly hope this helps someone out in getting their wonderful creation running silky smooth!

If you have any other useful tips a tricks to help a track run smooth please feel free to add them.
 
Last edited:
I have been asked numerous times to post some of the different tips I have posted in other threads in one location. When I have some free time I will add to this thread. if you have any neat modeling tips and want to include them you are more than welcome.

CREDIT: Credit goes out to @bzucobzuco as he was the one that originally came up with the concept in the luccaring thread.

So the first tip is horizontal planes for the trees so they have shadows around 12 noon. You may be thinking well that sucks I already did my trees I don't want to have to redo them. the cool thing is you don't have to and I'm going to show you how.

NOTE: I work in blender so all my tips will be on that platform.

First off let me show you what in the heck I'm talking about in the first place.

This is a normal set of trees at 12 noon

upload_2016-6-10_20-27-4.png


This is with the horizontal plane in place. Now in my case I just used a single shadow texture for all of them since none of my trees are real close to the track. But if yours are right on the road edge you may want to use 4 or so different shadow textures so they don't all look the same like these do.

upload_2016-6-10_20-27-30.png


So here is how you do it.

First off on my trees I have my pivot points all on the bottom of the object. if you didn't do this that is fine. but in the future I suggest you do that as it makes it much easier to apply a random scale to you trees so they all aren't the same size.

So the first step is you need to make a texture. It is basically the same as a normal tree texture except you set the opacity of the main layer to 1%. You will need PS for this as the DDS exporter for gimp does not seem to make the texture properly

This is what it looks like at 100%. Just set the opacity to 1% and then export to DDS DXT5. Attached below is the actual working DDS found on my track and shown above. You may use it as you wish.

upload_2016-6-10_20-27-43.png


So now that you have the texture you must make the plane and then get that plane to be in place on each existing tree. What you do is select all the trees you want to have this shadow and then duplicate them BUT DON'T MOVE THEM. Just duplicate them in place and hit the M key and select an empty layer in your blender file. Now you have the trees duplicated and sent over to a separate layer from your main trees.

In the new layer duplicate a single tree and move it away from the rest and single it out. Also make sure it is perfectly vertical and not tilted in any way.

upload_2016-6-10_20-27-58.png


Next create a plane and position it over the tree you singled out. Now would be a good time to map your texture to it. The plane can be single sided but the texture MUST FACE DOWN.

upload_2016-6-10_20-28-21.png


Now you want to join the plane to the tree object

upload_2016-6-10_20-29-51.png


Once joined go into edit mode and delete all the parts of the original tree.

upload_2016-6-10_20-30-8.png


Now you have a plane with the correct pivot point of the original tree.

upload_2016-6-10_20-30-34.png


Now comes the simple part. Select all your trees but make sure the plane is active

upload_2016-6-10_20-31-14.png


Hit CTRL+L and choose "Object Data" and you will get this.
upload_2016-6-10_20-33-59.png


Now your plane is in place of the original trees with the correct scale and angle of the original tree.

Next post I will explain the KSeditor settings.
 
So this is settings in the editor.

upload_2016-6-10_20-35-31.png


EDIT: noticed you can't see the settings lol. the only thing that matters is the ksalpharef. the rest don't make any difference.
upload_2016-6-10_20-36-26.png


You can play with the numbers a bit to make the shadow thicker or thinner.

And on another note I also did a similar process for the tree line. I made a long texture texture out of the same texture used on the individual trees

upload_2016-6-10_20-36-44.png


This way inside the first tree row it is shaded.

upload_2016-6-10_20-37-0.png


So it doesn't look like this

upload_2016-6-10_20-37-15.png


below is a zip with both the single and tree line textures. Again you are free to use them as you wish.
http://www.mediafire.com/download/0nqjfcfh2m99whb/tree_tops.zip

I hope this made sense and helps somebody!
 
Well here is another best practice post. In this we will discuss the difference between the visual road and the physical. There has been some confusion and misinformation going around I would like to clear up and set the record straight.

First off years ago there was no difference between the visual and physical road. What you saw is what you were driving on. This was fine but with the advancement of the physics engines we needed more road detail to feel all the little bumps that every track has. The problem was if you added too much detail to the visual road the framerate suffered. So what developers came up with was to separate the physical road from the visual. This allowed a very high detail, and invisible, physical road to hide under the visual.

Just to show the difference this is what they look like.

Visual. The key here is the poly count needs to be just high enough so your turns looks smooth and not a bunch of straight lines. Notice the turn is of a higher detail than the straight.
upload_2016-6-10_20-43-21.png


Physical
upload_2016-6-10_20-43-32.png

Be reasonable with your numbers. For example Kunos Monza is exactly 400k triangles and the Nordschleife is around 730k triangles. The key is to make sure you set the renderable setting in the editor to false. Also obviously the the physical model should be called 01ROAD and the visual can be anything else like VISROAD

The reason this is important is if the physical layer is low count like the visual you get this "notchy" feel to your track. If you have a hill instead of driving smoothly over it you are essentially driving over one flat plane after another.

You want this
upload_2016-6-10_20-45-32.png


Not this. This is exaggerated for show.
upload_2016-6-10_20-45-52.png


There are many different ways to accomplish this so I will simply show you a few things not to do.

First is a simple subdivide. You start off with something like this.
upload_2016-6-10_20-46-8.png


A simple subdivide looks like this. All you did was add to the poly count but didn't change the shape.
upload_2016-6-10_20-46-21.png


Then there is the Catmull-Clark subdivide. Notice it smoothed it out as well as adding to the poly count. This obviously also changes the shape somewhat and there are different ways around it. This is meant to show the basic concept.
upload_2016-6-10_20-47-1.png


One other thing to watch out for is the spline you build the track from. You have to make sure the spline resolution is properly set. Here are some examples.

By default the resolution for the spline in blender is 10 or 12. Shown here it is set to 2 to better show what is happening.
upload_2016-6-10_20-47-14.png


You can see no matter how many sections you add to the road it will always follow the resolution of the spline. And remember it isn't just doing this on a turn. It is also doing this up and down hills causing the constant bumps we all know and hate from many conversions from older sims. What you want is this. Here the spline resolution is set to 64 and the road is now smooth with the same poly count as before.
upload_2016-6-10_20-47-24.png


The next part will show how to apply different displacement modifiers assigned to different vertex groups to create bump details in your now higher poly road surface. After that we will apply decimate and subdivide modifiers to get the triangles shown above in the second shot. If I have time later I will post it but not likely until Monday or Tuesday.

As always I hope this helps someone in their track making ventures. And if anyone has anything to add please do.
 
Well here is some of part 2. I am going to go into how to actually make the second physical layer out of the visual. First off I built my track from a Bezier curve and I wanted to mention one key thing that somewhat ruined my week a while back. Under the curve options make sure "Twisting" is set to "Z-Up". by default it is set to minimum which if you mess with the camber in one section it can slightly twist the whole track.

OK so step one in track making is getting your layout. I'm not going to go into any detail on that as there is TONS of info about that. So we are going to start off that you already have a spline made and an array of planes applied to the curve like this.
upload_2016-6-10_21-1-34.png


The array modifier must be applied but do not apply the curve modifier.

As you can see this is fairly low poly. I am going to exaggerate a bit on this so things are easier to see. This is the point at witch you can add some polys to make the turns smooth. What I do is select just the edges of the section that needs some more detail and then subdivide it. A simple subdivide works here since it will take the shape of the spline and smooth it out. Without the spline it will simply add polys without changing the shape. This is why it is important to always keep the curve modifier intact.
upload_2016-6-10_21-1-58.png


Do this as many times as needed to get the curves to be smooth. The straights are less important but they can be fairly detailed. If you go too low you will see the straight lines going over a hill if there is an elevation change.

Now remember you can drive on this for testing by simply calling it 01ROAD. In the beginning it is easier to keep things simple and make sure everything is as you want it. Once you are happy with it or have it pretty darn close you simply duplicate it. I moved it up on this for show but when dealing with things like this it is best to send it off into another layer with the M key.

Now I simply subdivided 3 or 4 times. You can use the tool for this or the modifier it is up to you. The tool is somewhat of a one way street where using the modifier can simply be deleted at any time. Also remember if you do need to make changes BOTH still have the curve modifier active. So simply change the curve and both will be identical.
upload_2016-6-10_21-2-24.png


Now comes the fun and tricky part. Adding bumps to your surface. Bumps are only applied to the physical layer. When you are done you shrinkwrap the visual over the physical and it matched the bumps as close as it can.

If you don't know how to use vertex groups then read up on it. I'm not going to go into detail on how to do it since it is fairly simple to learn on your own. But basically you create a vertex group and select the verticies you want assigned to the group.

I made two groups in this. One will be a rough bump and one more of a wave. Go ahead and assign a displacement modifier to your physical mesh. You will see a section for texture and vertex group. First select the group you want it assigned to. Then click "new" under the texture section. It would be a good thing to name this texture at this time. Next you want to click the little icon that is circled in red below. It sends you off into the texture section automatically. Below that is the texture section. It is the red and white checker board icon.

upload_2016-6-10_21-2-40.png


Play with these settings all you want. I like clouds as it is very versatile. Here are the two sections both done with the cloud texture. These are both set to extremes for show. My largest bumps on Bridgehampton are .065.
upload_2016-6-10_21-3-8.png


Also they do not have to be fully separated like this either. If you want a small amount of noise throughout the whole track you can have a vertex group with the whole track as well as the separate sections. A vertex can be applied to multiple groups.

So now we want to make that irregular surface as shown in my shot int he first part of this. This is as simple as applying a decimate modifier and then a subdivide modifier.

upload_2016-6-10_21-3-26.png


Play with the numbers as you see fit and subdivide as much as you need.

And there you have it. Hopefully that clears some of this up.
 
So you want a photo quality road surface. Well tough I'm keeping that secret to myself :p

Oh heck I'm in a good mood maybe I'll share some wisdom.

upload_2016-6-10_21-8-50.png


upload_2016-6-10_21-8-58.png


First off the shader required here is ksMultilayer_fresnel_nm

Second here are the settings directly from the editor.

upload_2016-6-10_21-9-9.png

upload_2016-6-10_21-9-26.png


Now I will go through all those textures and how to set them up to produce what you see above.

First off is the road diffuse. This texture should be 1024x4096. You want as long a texture as possible to limit the amount of times it repeats. Shown below is the diffuse with the alpha channel next to it. basically the alpha channel here is your specular level. White is 100% and black is 0%. What I simply do is make the alpha channel a copy of the diffuse and adjust the levels how I want them to be. The format of the diffuse should be DXT5 and with about 4 mipmaps

upload_2016-6-10_21-9-35.png


In general you only want to use one single diffuse for your entire road. You may ask "how do I get color variations and such?" The answer is in the detail textures. Change the color of the detail textures and you change the color of the road. Best to have 4 or 5 1024x1024 textures than 4 or 5 1024X4096 textures.

Next up is the mask. My mask is fairly small at 128x512. It does not need to be as large as the diffuse. Mine looks like this and is in DXT3 format with 4 mipmaps.
upload_2016-6-10_21-9-45.png


The red is where the main road detail image is shown and the purple is where the main red channel detail is mixed with the blue channel crack texture. You can play with this bad boy all day long and even mix in the green channel if you want with another detail texture. I only used the two channels. You shouldn't need to use the alpha channel with this so it should be 100% black if it is not used with a detail texture.

Now the main detail image. It should be 1024x1024 in DXT5 format with 4 mipmaps and it looks like this. The main texture is on the left and the alpha channel is on the right. This alpha channel is also specular so here you want it fairly dark with only some pebbles light to light up by the sun.

upload_2016-6-10_21-9-57.png


If you are not using any of the color channels in the mask you can simply repeat the main detail image just to complete the form in the editor. In my case I don't use green so it gets the main detail again.

The blue channel is the cracks texture. It should be 512x512 and DXT3 with 4 mipmaps. Again the alpha channel is spceular. You will have to fine tune it so it matches the detail texture it blends with.

upload_2016-6-10_21-10-15.png


For the txdetailA is not used in this case so it can be set to the main detail like the green channel.

And last is the normal map. It should be 1024x1024. No alpha is used on this and it can be DXT1 with 4 mip maps. You adjust the normal map resolution with the two numbers in "detailNMMult"

upload_2016-6-10_21-10-25.png


I hope this helps clear up how to set the textures to make this shader work properly. I would suggest you use my settings to start and then you can play with the numbers to make them work for you.
 
So I have another quick tip here that has to do with trees. Now when Brands Hatch came out I looked at the trees and was very impressed. When I compared them to mine their shading was much more natural with much more consistent lighting. It wasn't so apparent with the summer trees but was terrible with fall with the brighter colors.

So I studied the Brands Hatch trees very closely and discovered two things.

First is this little thing called a shadow under a Y tree at a high sun position. You are welcome Kunos ;)
upload_2016-6-10_21-14-3.png


Second is the shading of the tree from the normals. Shown here only the very bottom of the tree is dark and the rest is bright.

upload_2016-6-10_21-14-17.png


Compare this to my trees from 1.0 of Bridgehampton and you see how the dark "triangle" goes all the way to the top.

upload_2016-6-10_21-14-44.png


I fought with this for hours trying to figure what the heck Kunos was doing here. In the end I wanted to kick myself as the solution was insanely simple.

On the right is what my trees looked like before. A simple plane from top to bottom. On the left is what I determined Kunos is doing. The results give you that small black triangle at the bottom of the tree.
upload_2016-6-10_21-14-54.png


I played around with it and ended up going with only a subdivide vertically. This makes the dark area more spread out along the bottom
upload_2016-6-10_21-15-12.png


The results look like this.
upload_2016-6-10_21-15-22.png


And for a clear comparison here is a shot of my 1.0 fall trees and one of the new 1.1 trees using the technique shown above.

1.0
upload_2016-6-10_21-15-31.png

1.1
upload_2016-6-10_21-16-10.png


Notice the shading is much more consistent and cleaner. No more dark centers. Now you might be thinking this will kill performance. Well I did direct side by side comparisons and saw little to no FPS loss when doing this to all 3000+ trees on Bridgehampton.
 
So I have a HUGE breakthrough for BLENDER users thanks to lucas-Xtremepsionic when it comes to the AI line INSIDE the editor. Since the beginning it has been impossible to precisely select parts of the AI line from within the editor. You get this

I clicked where the red arrow is and it selected where I circled. This makes it damn hard to edit the line.

upload_2016-6-10_21-22-58.png


Lucus found the answer in desperation when dealing with his huge Lake Louise.

Here is the process of making it work properly. What I did was I made a duplicate of my land and road object and sent to another layer in blender. You will be using this model only for editing the AI line.

Here is my duplicate model and you will notice its location is not 0,0,0. So the first step is to apply location

upload_2016-6-10_21-23-7.png


After you apply location the transform panel will look like this
upload_2016-6-10_21-23-19.png


Now the second step is you rotate the model on the X axis -90

upload_2016-6-10_21-23-27.png


the third step is to apply the rotation which will set everything back to 0 again

upload_2016-6-10_21-23-37.png


Now we need to export to the fbx. These are the settings for it. The key is Y forward and Z up. (Under normal conditions we use -Z forward and Y up)

upload_2016-6-10_21-23-46.png


I exported to a special AI.FBX as it will only be used for this purpose. I load into the editor as normal and load your recorded AI line. Now when you click the line it will actually select the line where you actually clicked.

Now you can use this video to fine tune your AI line the way it is supposed to work.
 
Last edited:
So here is the post specific to track conversions. As many may know I am not a fan of most conversions. My main reason is that most older tracks made for rfactor and other older sims are WILDLY inaccurate. In the two tracks I have worked on I started by looking over previous renditions of each track and found they were completely wrong in so many ways. But regardless of all that even if you convert a track to AC it deserves to drive properly.

This is all in blender. But the same principles should apply is any other modeling program.

First up is why converted tracks do not work right in AC. Older sims used the vertex normals of the surface so a low poly surface looks smooth to the sim. below is how a sim like rfactor sees this low poly object.

upload_2016-6-10_21-34-24.png


AC does not care about vertex normals and the same object looks like this in AC
upload_2016-6-10_21-34-33.png


This causes what I call the dreaded "staircase" effect shown here.


What we need to do is make a SECOND INVISIBLE road layer to drive on that looks more like this to AC

upload_2016-6-10_21-34-59.png


I'm not going to go over the process of getting the track from kn5 to a 3d program for obvious reasons. If you are converting you probably already know how to do this. So we are going to start off with the track within the 3d program. Shown in the example is Phillip Island.

First you need to select ALL of the road objects and RENAME THEM to something OTHER than 1ROAD. For the few I have done I simply put a VIS in front so it becomes VIS1ROAD. This will make the road so it is no longer physical and is only visual. Once renamed export the track as normal and save it as the usual kn5 file. The track will now be un-drivable. you will see the road but you should fall right through it.

Second is I duplicate the road and send it off to another layer.

upload_2016-6-10_21-35-12.png


upload_2016-6-10_21-35-23.png


I have found it is best to now join all the objects into a single object. You will then have to isolate any runoffs or pit lane entrances

Here we see an offshoot of the road and we need to clean it up and separate it.
upload_2016-6-10_21-35-33.png


Here it is cleaned up and the offshoot separated. You will want to retain the the original pattern as much as possible. REMEMBER this will be INVISIBLE so you DO NOT care about UV maps in any way.
upload_2016-6-10_21-35-43.png


Once you get it all cleaned up you need to return to quads. Blender has a handy tool to do this. You select all in edit mode and hit ALT+J

upload_2016-6-10_21-35-59.png


Now as long as you cleaned everything up all you need to do is use a subdivide modifier

upload_2016-6-10_21-36-9.png


It should look like this

upload_2016-6-10_21-36-19.png
 
Now that it is all subdivided you will need to first APPLY the modifier and then break it up into multiple pieces.

Make sure all these objects INCLUDING the offshoots and pit lane entrances/exits, etc. are named with the ##ROAD naming scheme. These will be what you drive on. Usually you won't have to subdivide anything other than the racing surface itself.

You will now export the subdivided model to a SEPARATE fbx and kn5 file from the main model. I call mine phy.kn5 short for physics.

In the editor you need to make EVERYTHING in the phy file INVISIBLE. I use the node grid under utilities. I select all under the "renderable" row and put 0 in "new value" and hit edit.

upload_2016-6-10_21-38-4.png


Now save persistence and save as kn5.

You now need to create a models.ini file to put in the track folder. It should look like this inside the INI.

[MODEL_0]
FILE=phillip_island_circuit.kn5
POSITION=0,0,0
ROTATION=0,0,0

[MODEL_1]
FILE=phy.kn5
POSITION=0,0,0
ROTATION=0,0,0

This is what the folder will look like

upload_2016-6-10_21-38-18.png


SOMETIMES this process will break the AI line and sometimes it won't. If it crashes on load after this process just delete or rename the ai folder and it should load up. If it does, and everything drives well, just simply record a new AI line.

If everything worked right the "staircase" effect should be gone and it should drive properly.


If you are interested in adding bumps then look at this earlier post.

http://www.racedepartment.com/threa...n-track-making-plus-tips.122794/#post-2256509

EDIT: IT took me longer to make this post than it took me to do both phillip island AND sandown combined.
 
Got another quick tutorial today. A few have asked how to use the AC_CREW tag so you have have haulers, tents, and other objects not only to appear depending on grid size, but also have the colors and logos from the ac_crew.dds texture found in car skins.

Some examples of what I'm talking about. In practice mode pit lane will be empty except for your pit box and there will be one hauler. With full grid it looks like this.
upload_2016-6-10_21-42-50.png


upload_2016-6-10_21-43-5.png


The first part of this is the object name. AC_CREW_0, AC_CREW_1, AC_CREW_2, etc. The numbers have to match the pit and grid objects. So if you have 24 boxes you have 0-23 AC Crew objects. You can also add to the object name if you need to. For example AC_CREW_20, AC_CREW_20_truck, AC_CREW_20_tent will all load up if there are 20 cars on the grid. If all objects are near one area is would be best to combine them as one. But if say you are going to add or subtract objects like RVs and cars all around the track you would want to have multiple objects around the track so they can load and unload as you go around the track. Just as long as the # matches in the ac crew tag they will all load when there is a car to fill that number spot.

The second part is using the ac_crew.dds texture so they can have the colors and sponsors displayed from whatever car is loaded.

Go to any car folder and look at the skins and you should find a ac_crew.dds texture. Not all skins have them but all the official ones should. It will look something like this
upload_2016-6-10_21-43-17.png


This is the texture you will use and UV map to your objects. Below you can see how I mapped the trailers on the trucks. You can see I defined the area were the logo should be and the rest I just mapped to a tiny area of the texture that is just a solid color. The windows and door details on the rig I had to use a second floating plane and used alpha channels to define the edges.
upload_2016-6-10_21-43-28.png


Here is an example of how I mapped the tents
upload_2016-6-10_21-43-38.png


The trick to using this texture is the material name. You must use the material name Pannello_Skin_00. When you load into the editor make sure it doesn't look like Pannello_Skin_00_ac_crew.dds. If it does it won't work. This can happen if you use the FBX 6.1 ASCII export setting in blender. You must use FBX 7.4 binary for it to work right. I think this only affects blender users.

Then when you load the editor you can setup your material like normal and save as kn5. Now the thing that had me running around in circles is you MUST RENAME THE AC_CREW.DDS IN THE TRACK TEXTURE FOLDER!!!! If the texture is still there it will override everything and only show that one texture and not the ones from the car skins. So rename or delete that file to test in the sim.
 
Thought I would add to this thread and post a basic overview of trees in AC. There is some confusion out there as to the right and wrong way to setup trees for AC. Below are some examples of different trees and what they look like in the editor/sim.

Here they are in blender. I did 4 basic types of trees and shown in red are the object names. Two of them use the KSTREE naming scheme and two do not. The TREE on the far left has all normals set to vertical. The rest the normals are untouched from default. Also notice the vertical subdivisions.
1.JPG

Here they are in the editor with sun overhead. You can see we now have 4 very different trees. the far left with vertical normals is fully lit with no shading at all. Next to that we see that using the KSTREE object name has altered the normals automatically. The issue here is the entire center of the tree is dark and only the edges are lit up. Next to that in group B you can see the desired result. The only difference between A and B is the extra vertical subdivision shown above. Then TREE2 is just a disaster.
2.JPG


Here they are at low light. As you can see TREE is still lit from top to bottom and completely unnatural. I believe this is what most RTB trees are doing. Group A doesn't look bad but again too dark in the center. Group B again is the desired result. TREE2 still a disaster. All 4 trees here are using the same shader settings.
3.JPG


One important thing about the tree objects is in order for the KSTREE auto normals to work properly the origin of the object MUST be at the bottom.
4.JPG

Now lets discuss the whole GROUP thing. It is worth mentioning that from within blender or 3DS you MUST keep the tree objects separate. DO NOT join them together. The KSTREE naming scheme does that for you with the groups.

So here is a shot of Bridgehampton trees in blender. Selected below is GROUP_A. Notice each tree is a separate object.
groupA.JPG


Just to show here is GROUP_B. This trend goes around the whole track with GROUP_C. GROUP_D, etc.
groupB.JPG


You do not have to use A, B, C, D, etc. You can use anything like KSTREE_GROUP_PINE_, KSTREE_GROUP_MAPLE, etc. I find the letters the easiest.

This is what it will look like after you load it in the editor. there will be a section called "BLOCKTRANSFORM" and you will find the group names in there. The KSTREE_GROUP part of the name will be stripped away.
5.jpg


I hope this clears up some confusion. Also know that just because you use the KSTREE_GROUP_x_ naming scheme DOES NOT mean you have to use the kstree shader. The entire point of the KSTREE naming is to auto set the normals for you and join to single objects according to group name. You can also use KSTREE naming on 3D trees and it will set the normals just like a Y tree. Just make sure the origin is always at the bottom and the normals will all be done for you on import to the editor.

Some final examples of trees in sim. Notice how the bottoms are all dark as they should be.
Screenshot_bmw_z4_gt3_njmp_lightning_11-2-117-14-54-58.jpg

Screenshot_bmw_z4_gt3_njmp_lightning_11-2-117-14-55-31.jpg
 
Last edited:
Thanks for porting this info over to the RD Forums. It's an invaluable resource for the creators here. :)

Almost making me want to teach myself Blender and get a project off the ground (now, if only I wasn't buried under work...)
 
I am trying to make a fictional track for AC. This topic and other on assettocorsa.net help me all. But I have two questions :

1 : How do you do to stitch 3d curbs (made with array+curve modifiers) with grass and road. I have to fix gaps by hand for all curbs ?
Capture2.PNG
2 : How do you unwrap long curved objets (like grass) where i made some triangles to save poly. I can't use follow active quad !
Capture.PNG
 
I'm just doing curbs now for Watkins. If you pay attention to most kunos tracks they simply put a tail on the front edge of the curb that goes under the road.
upload_2017-8-26_10-28-2.png


upload_2017-8-26_10-28-29.png


Here you can see how I joined it to the land.
upload_2017-8-26_10-37-30.png


As for objects that are still attached to a curve and need to be UV mapped you can go into top view and Project from view to map it. Since it is on a curve the base object is actually still straight so the UV map will be perfectly straight.
upload_2017-8-26_10-40-7.png
 
Last edited:
That's interesting... I Thought the AC Physics engine didn't play nicely when two physics meshes overlapped? IIRC that was a huge problem with the first release of Joux Plane way back in the infancy of AC modding.
Who says what I showed is the physical? You are looking at a visual road and visual curb. The physical curb will not have that tail. Nothing you see on a kunos track is physical. Remember that.
 
Back
Top